
I was kinda artsy this weekend. Kinda. I finally tackled two projects I’ve been wanting to get to for a long time. It wasn’t that I had a sudden burst of energy, but they were both fun (mostly) and that’s what got my butt in gear.
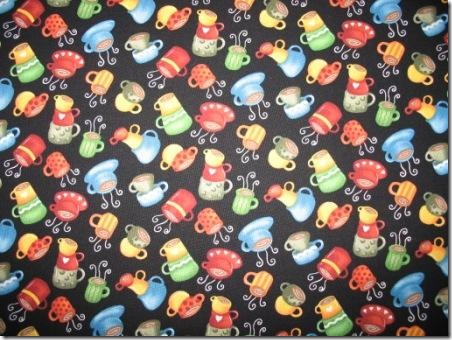
One project was spiffing up an old, ugly bulletin board to use in our kitchen. I’m not a big fan of the cluttery bulletin board look, but I’ve also gotten tired of looking for important papers the kids insist they put on my desk last week. We’ve been needing a gathering place for those things. I primed and painted the plain wood frame, and then used spray adhesive to cover the cork board with this fabric, which we’ve used in several other places in our kitchen:
I have one small thing left to do before this is finished—I need to glue ribbon or cord to the inside edge to cover up the raw edges of the fabric where they didn’t quite get under the edge of the frame, dammit. Actually, this will make it look a little fancier (if a bulletin board can ever look “fancy”) so it’s not such a bad thing.
Alright, so I probably wouldn’t even bother mentioning this project if not for the other one I worked on, because the bulletin board is kinda lame and not all that impressive. But the other one was a lot more work and it’s kinda like, um, super cute.
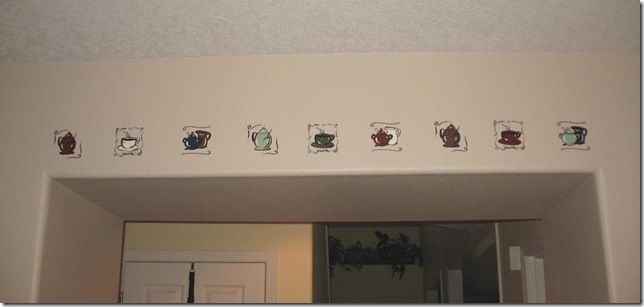
I’ve had these coffee art transfer thingies for years and haven’t known the best place to put them. I finally chose a spot and set of colors and got to work.
Step 1: Use a popsicle stick to transfer the outline of the image onto the wall. This is tricky when your walls are heavily textured like ours, and also when the transfers are many, many years old. Victor and I cursed a little over this step, but here’s what it looked like when we finished:

I don’t know why our walls look that taupe-y color in the pictures. They’re actually a nice, creamy coffee color.
Step 2: Paint the center image. I used the colors that are in our kitchen rug: navy, dark red, dark olive, light olive, off-white, and brown. There are nine images total (three of each of the above).

Step 3: Use a popsicle stick to transfer the accent layer to the painted images. Again with the swearing! I ended up doing a lot of touch-up with white and black paint to fill in the spots where the accent transfer wouldn’t transfer. Here’s how three of the images looked when the project was complete:

And this is the whole set:
The place I chose for this art is up high and necessitated the use of a ladder. Anyone who’s been paying attention knows this formula: Jen + high places = certain injury. I only ALMOST fell three times, and have just one blister and three raw knuckles. But no broken bones! No trips to the emergency room! Very few tears! Just lots and lots of cursing!

Yay for no broken bones! And it looks great - bonus!
ReplyDeleteReally cute, Honey!! I like it!! (And, of course, Katie and Jack were locked in their rooms so they didn't hear Mommy swearing.... Right? Of course right....)
ReplyDelete